
Creating a Kubernetes Operator Using C#
Note: The code seen in this post is based on KubeOps 7.6.0. There is work in progress on version 8.0, but that is a preview build of the library and was not available when I started this research. “Your mileage may vary.”
The Kubernetes Operator Pattern is a Kubernetes development pattern aimed at simplifying complex Kubernetes workload deployments. The idea of a Kubernetes Operator is similar to a human operator for a complex system - they know how the system is deployed, have a deep understanding of how it works, and know how to react if a problem were to arise. Kubernetes Operators work in a similar manner - they deploy and manage Kubernetes workloads, and they can also handle some error conditions for a given workload.
Some use cases for a Kubernetes Operator might include:
- Deploying a complex application
- Handling upgrades to an application
- Simulating a failure
- Handling leadership election within a distributed application without an internal election process
Examples of commonly used Kubernetes Operators include:
Anatomy of an Operator
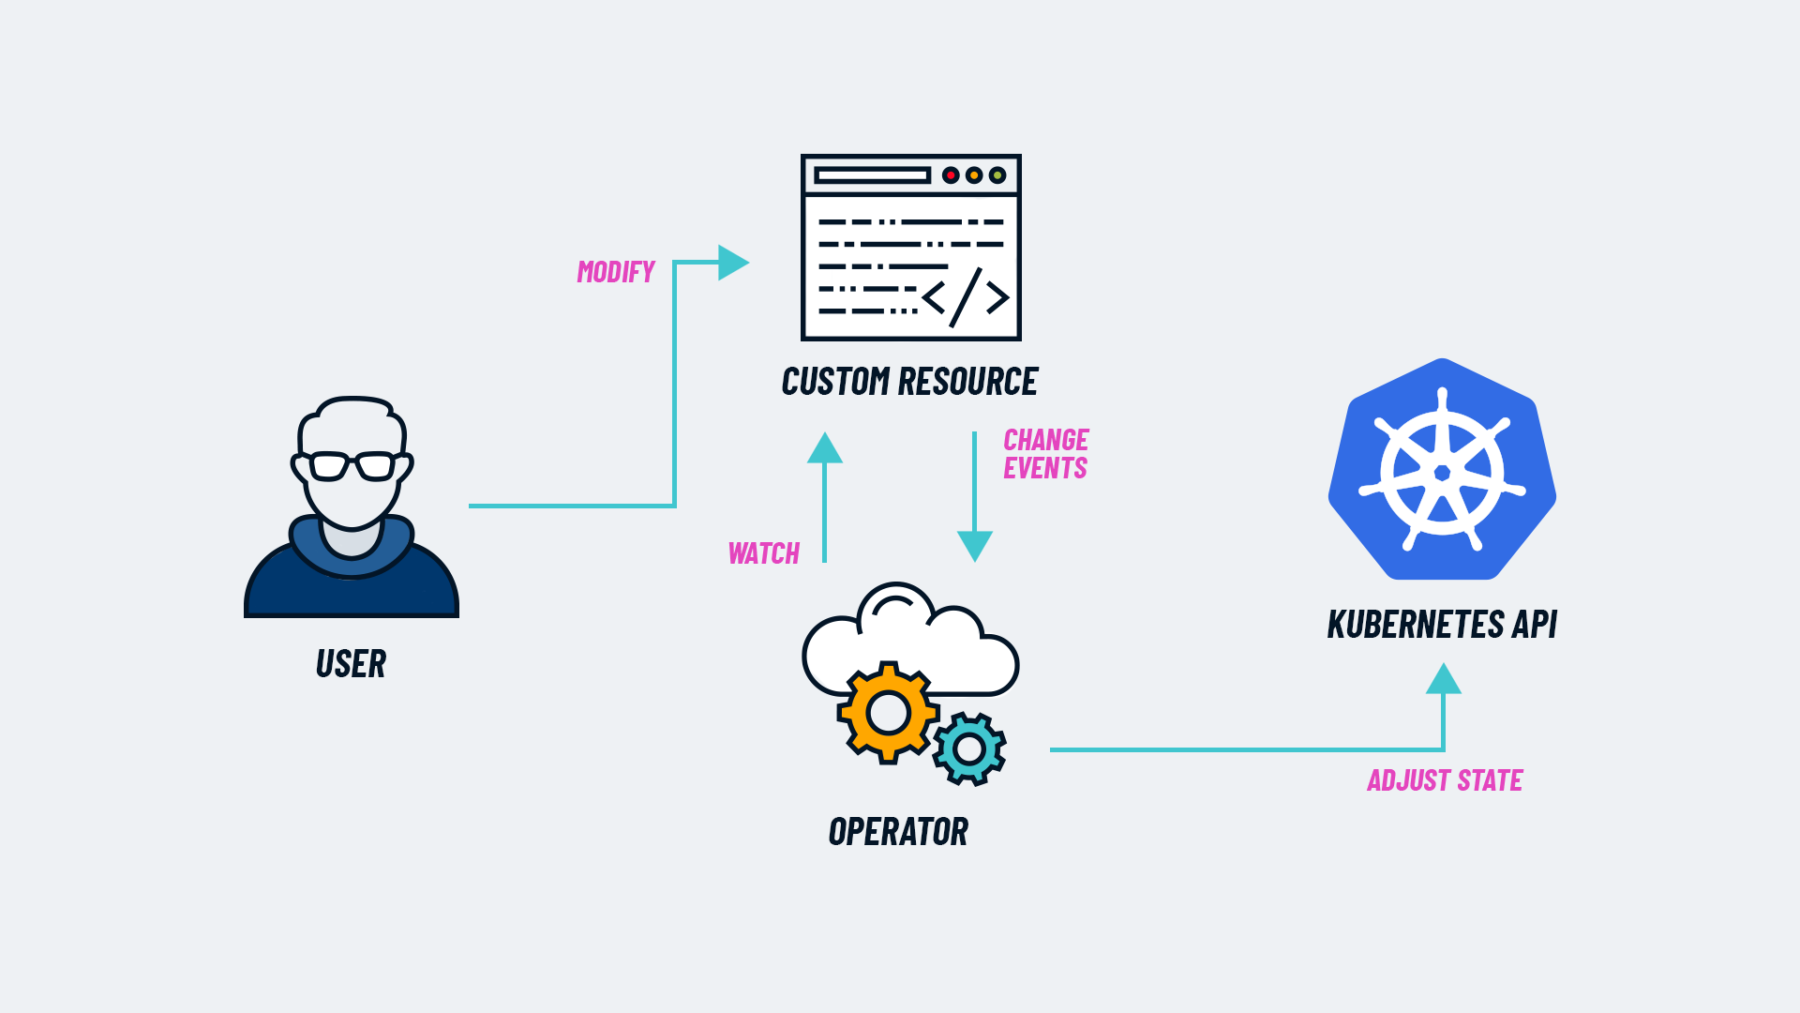 Kubernetes Operator Pattern High Level Diagram
A Kubernetes Operator consists of an Operator (or Controller) workload and Custom Resource Definitions (CRDs). At a high level, the Operator watches for changes to the CRDs, and based off of those changes it’ll create and/or modify resources within the Kubernetes cluster. Operators manage these resources by using a combination of Reconcilers, Finalizers, and Admission Webhooks.
Reconcilers
A Reconciler is exactly what it sounds like - it maintains the desired state of whatever the Operator is managing. It is the most heavily exercised component of the operator, and it’s the only required component within an Operator. Reconcilers are usually called for every event that triggers a Controller since they are responsible for ensuring the desired state of the system.
Finalizers
Finalizers are used to implement “cleanup” tasks when a Kubernetes resource is deleted. This can include deleting resources, calling external APIs to unregister services, and deleting other CRDs which could trigger other events within the cluster. An object within a Kubernetes cluster will not be deleted until all finalizers for that resource type have been completed. If a finalizer is unable to run, the resource will not be deleted. For more information on this, see Kubernetes Finalizers documentation
NOTE In the C# library I’m showing in this example, finalizers are only registered to CRDs. A finalizer could be registered to any Kubernetes resource and can be used to execute tasks based on any Kubernetes resource.
Admission Webhooks
Webhooks are used to extend the normal admission behavior of the Kubernetes API. The Kubernetes object admission process has two phases - mutation and validation, and can be extended by making use of mutation and validation webhooks.
- Mutation - these webhooks run in the mutastion phase of object initialization, and will run in series. The objective of these webhooks is to mutate a new object (such as filling in originally unset fields or adding additional labels). This type of webhook should be used with caution, as it could lead to confusion among users when they get back an object that’s different than what they intended to create.
- Validation - these webhooks run in the validation phase of a Kubernetes object (which occurs after the mutation phase), and are used to extend the object validation behavior. Because these are called after the mutation phase, these webhooks may not modify the objects. These webhooks are all called in parallel. Object validation failure will occur if any one of the validation webhooks fails.
Writing an Operator
Kubernetes operators can be written in a variety of languages. Since I’m familiar with C#, I decided to write my sample operator in C#. The premise of this operator is similar to the premise of any other operator - a controller will be monitoring for changes to a CRD Object, and will act based on the state change of that object. In the case of this example, I’ll be creating an operator which deploys a ConfigMap and a Deployment consisting of Ubuntu pods.
KubeOps NuGet Package
I’ll be using the KubeOps library for authoring my Operator in these examples. The KubeOps library extends the base AspNetCore project type and relies on the included DI framework and project patterns, so if you are familiar with this type of project these concepts should feel familiar.
The KubeOps library handles a lot of things for us, such as creating a Dockerfile for building the controller image, and creating the kubectl files to deploy RBAC, CRDs, and workloads required for our operator. This allows us to work almost fully within the C# language for creating our operator.
Defining the CRD Entity
Operators work based off of CRD objects, so first we need to define our CRD entity. In KubeOps, this is accomplished in C# code. For our example, we’ll create a ubuntu.example.local/v1alpha1 object, which translates to an entity type named ubuntu within the v1alpha version of the example.local API. To do this, we need to create three classes:
- Spec - specifies the user-defined fields within the CRD
- Status - specifies the status fields used by the operator, if any.
CustomKubernetesEntityImplementation - Defines the actual entity. Generally this will be an empty class.
Additionally, I’ve defined what the CRD should look like down below my entity in a comment just as a reference - this will help create the EntitySpec class.
using k8s.Models;
using KubeOps.Operator.Entities;
using KubeOps.Operator.Entities.Annotations;

public class UbuntuV1Alpha1Entity:CustomKubernetesEntity<UbuntuV1Alpha1Entity.EntitySpec, UbuntuV1Alpha1Entity.EntityStatus>
{
    public class EntitySpec
    {
        //Defined below
    }

    public class EntityStatus
    {
        //Intentionally empty
    }
}
/*
apiVersion: example.local/v1alpha1
kind: Ubuntu
metadata:
  name: ubuntu-example
  namespace: default
  labels:
    example.local/version: v1alphal1
spec:
  ubuntuImage: latest
  ubuntuReplicas: 2
  ubuntuCommand: ['/bin/sleep', '3650d']
  favoriteFootballTeam: 'Buccaneers'
*/
The EntitySpec class should just consist of C# properties which define the CRD properties. Additional documentation and validation can be added to further describe and validate the CRD spec. The KubeOps library will use these properties and attributes to generate an OpenAPI schema, which is then used to generate the CRD object definition.
public class EntitySpec
{
    public string UbuntuImage { get; set; } = "latest";

    [RangeMinimum(Minimum = 1)]
    public int UbuntuReplicas { get; set; } = 1;

    [Description("A list of commands and command args to pass into the `cmd` property of the pod")]
    public List<string> UbuntuCommand { get; set; } = new List<string>();

    [Required]
    public string FavoriteFootballTeam { get; set; } = string.Empty;
}
Lastly, we need to decorate our Entity class to define our CRD API definition. To do this, use the KubernetesEntity attribute and specify the Group, Version, and Kind parameters. KubeOps will use this information during the build process to generate the CRD definition and deployment file.
[KubernetesEntity(Group = "example.local", ApiVersion = "v1alpha1", Kind = "Ubuntu")]
public class UbuntuV1Alpha1Entity:CustomKubernetesEntity<UbuntuV1Alpha1Entity.EntitySpec, UbuntuV1Alpha1Entity.EntityStatus>
{
    # Class definition code removed
}
Creating the Controller and Reconciler
Now that the CRD is created, we need a Controller and a Reconciler. The Reconciler code could live within the Controller methods, but it’s normally contained outside of the Controller for organizational purposes. Let’s create the Reconciler first since that’s going to be called by the Controller.
Our Reconciler needs to be able to create and update a deployment resource and a configmap resource. For organizational purposes, I’ll split these processes into a ReconcileConfigMap and ReconcileDeployment method, which then gets called by the main ReconcileAsync method. The reconciliation methods will use an IKubernetesClient to make calls to the Kubernetes API for creating and modifying resources.
public class UbuntuV1Alpha1Reconciler
{
    private readonly ILogger<UbuntuV1Alpha1Reconciler> _logger;
    private readonly IKubernetesClient _kubernetesClient;

    public UbuntuV1Alpha1Reconciler(ILogger<UbuntuV1Alpha1Reconciler> logger, IKubernetesClient kubernetesClient)
    {
        _logger = logger;
        _kubernetesClient = kubernetesClient;
    }

    public async Task ReconcileAsync(UbuntuV1Alpha1Entity entity)
    {
        await ReconcileConfigMapAsync(entity);
        await ReconcileDeploymentAsync(entity);
    }
}
The code to do the actual resource reconciliation in this example is pretty simple - if the resource doesn’t exist create it, and if the resource does exist update it. These resources are modeled as C# objects within the KubernetesClient library, which is a dependency of the KubeOps library.
private async Task ReconcileConfigMapAsync(UbuntuV1Alpha1Entity entity)
{
    var @namespace = entity.Namespace();
    var entityName = entity.Name();

    _logger.LogInformation($"Fetching configmap for entity {entityName}");

    var configMap = await _kubernetesClient.Get<V1ConfigMap>(entityName, @namespace);

    if (configMap == null)
    {
        //ConfigMap resource doesn't exist, so create it...
        configMap = new V1ConfigMap(); //Fill in the appropriate parameters
        _kubernetesClient.Create(configMap);
    }
    else
    {
        //Update the ConfigMap object parameters that we already have
        await _kubernetesClient.Update(configMap);
    }
}
Now that the Reconciler is created, let’s create the Controller. Our Controller class will implement the IResourceController interface from the KubeOps library. There are three overrideable methods within an IResourceController implementation:
ReconcileAsyncis called whenever an event occurs which triggers reconciliation for an entityStatusUpdatedAsyncis called whenever a status change occurs for an entityDeletedAsyncis called whenever an entity is deleted from the cluster
For this example, we will only implement the ReconcileAsync method since our CRD doesn’t have any Status paramers and there’s no additional logic that needs to occur on resource deletion. The logic inside of ReconcileAsync is going to be very simple - just call the Reconciler.
public class UbuntuV1AlphaController:IResourceController<UbuntuV1Alpha1Entity>
{
    private readonly ILogger<UbuntuV1AlphaController> _logger;
    private readonly UbuntuV1Alpha1Reconciler _reconciler;

    public UbuntuV1AlphaController(ILogger<UbuntuV1AlphaController> logger, UbuntuV1Alpha1Reconciler reconciler)
    {
        _logger = logger;
        _reconciler = reconciler;
    }

    public async Task<ResourceControllerResult?> ReconcileAsync(UbuntuV1Alpha1Entity entity)
    {
        _logger.LogInformation($"{nameof(UbuntuV1AlphaController)}.{nameof(ReconcileAsync)} called for entity {entity.Name()} - calling reconciler.");
        await _reconciler.ReconcileAsync(entity);

        return null;
    }
}
RBAC Setup
In order for the Controller to be able to operate, it needs permissions to monitor the Kubernetes cluster for the CRDs as well as to create the necessary resources - in this case, those are ConfigMap and Deployment resources. These RBAC permissions are declared by using EntityRbac attributes on the controller. One EntityRbac attribute needs to be used for each resource type required for RBAC access.
NOTE: By default, KubeOps will generate a
ClusterRoleandClusterRoleBindingfor thedefaultservice account. This can be changed by updating the generated yaml files.
[EntityRbac(typeof(UbuntuV1Alpha1Entity), Verbs = RbacVerb.All)]
[EntityRbac(typeof(V1ConfigMap), Verbs = RbacVerb.All)]
[EntityRbac(typeof(V1Deployment), Verbs = RbacVerb.All)]
public class UbuntuV1AlphaController:IResourceController<UbuntuV1Alpha1Entity>
{
    //Class internals intentionally removed
}
Creating the Finalizer
The Controller and Reconciler will create Kubernetes resources when they’re invoked, so there needs to be a way to clean up those resources when our CRD is deleted. This will prevent abandoned resources from occupying the cluster. This is handled by a finalizer.
public class UbuntuV1Alpha1Finalizer : IResourceFinalizer<UbuntuV1Alpha1Entity>
{
    private readonly ILogger<UbuntuV1Alpha1Finalizer> _logger;
    private readonly IKubernetesClient _kubernetesClient;

    public UbuntuV1Alpha1Finalizer(ILogger<UbuntuV1Alpha1Finalizer> logger, IKubernetesClient kubernetesClient)
    {
        _logger = logger;
        _kubernetesClient = kubernetesClient;
    }

    public async Task FinalizeAsync(UbuntuV1Alpha1Entity entity)
    {
        await DeleteDeploymentAsync(entity);
        await DeleteConfigmapAsync(entity);
    }
}
In this example, the DeleteDeploymentAsync and DeleteConfigmapAsync methods just call the Kubernetes API to delete the relevant Deployment and Configmap resources.
To register the Entity to make use of the Finalizer, register it using the IFinalizerManager which is a part of the KubeOps library. This gets called from the ReconcileAsync method in the Controller.
await _finalizerManager.RegisterFinalizerAsync<UbuntuV1Alpha1Finalizer>(entity);
Setting up the Program.cs file
The last step in all of this is setting up the Program.cs file. This uses the familiar builder pattern that is used by a typical AspNetCore application to configure dependency injection and set the “starting point” for the application. The only difference is that it will call a couple of extension methods from the KubeOps library.
var builder = WebApplication.CreateBuilder(args);
builder.Services.AddKubernetesOperator();
builder.Services.AddScoped<UbuntuV1Alpha1Reconciler>();

var app = builder.Build();
app.UseKubernetesOperator();

await app.RunOperatorAsync(args);
Since the Reconciler class is just essentially a “helper class”, it has to be explicitly included in the dependency injection configuration. The rest of the classes implement an interface in the KubeOps library, and the AddKubernetesOperator() extension and the RunOperatorAsync() extension handle all of the routing and dependency injection for those classes.
Generating the Kubernetes Assets
A Dockerfile is needed In order to build and package this operator. Likewise, some Kubeconfig files are needed in order to deploy the operator and its supporting CRDs, RBAC configurations, and workloads. The KubeOps library makes this very easy by generating those assets as part of the dotnet build process. It does this by coming pre-packaged with a console utility which is then called with a series of commands as part of the build process. The default build parameters are generally adequate, however they can be customized by setting some build property settings. Additionally, any of the documented commands can be invoked outside of the build process by passing the command into a dotnet run. For example, to generate the CRD objects without running a full build you could run dotnet run generator crd.
NOTE There is a known issue currently with running a
dotnet buildcommand when your operator contains webhooks. This is due to requiring thecfsslcertificate generation library. This can be downloaded by using thecurlcommands found in the generated Dockerfile (substitute the architecture in the URLs for your system’s architecture), and then setting theCFSSL_EXECUTABLES_PATHenvironment variable to the path where those files can be found. More information can be found in this GitHub issue.
Testing the operator locally
Testing the operator locally requires three steps: deploy the CRDs, run the operator, and create a CRD object in our Kubernetes cluster. The KubeOps Command Utility can deploy the CRD definitions by using the dotnet run install command.
The second step is to run the operator. This can be done in your IDE of choice by running the project in a Debugger, or by just running the dotnet run command. The dotnet run command and your IDE’s debugger will both start a Kestrel web server and serve the AspNetCore APIs, just like a normal AspNetCore project. The advantage of using an IDE and a Debugger (such as Visual Studio Code) is that it allows for stepping through the Reconciler and Finalizer methods for debug purposes.
Once the Operator is running, deploy an instance of the CRD. This will cause the Controller to execute the ReconcileAsync method, which in turn will call the Reconciler and create the Deployment and ConfigMap resources. This can be done using a console command similar to this:
cat << EOF | kubectl apply -f -
apiVersion: example.local/v1alpha1
kind: Ubuntu
metadata:
  name: ubuntu-example
  namespace: default
  labels:
    example.local/version: v1alphal1
spec:
  ubuntuImageTag: latest
  ubuntuReplicas: 2
  ubuntuCommand: ['/bin/sleep', '3650d']
  favoriteFootballTeam: 'eagles'
EOF
To confirm that the operator called the reconciler and all resources were created, query the kubernetes cluster for pods and configmaps.
kubectl get deployments
NAME             READY   UP-TO-DATE   AVAILABLE   AGE
ubuntu-example   2/2     2            2           2m4s

kubectl get po
NAME                              READY   STATUS    RESTARTS   AGE
ubuntu-example-6f7b8f5878-lxztc   1/1     Running   0          2m10s
ubuntu-example-6f7b8f5878-qf4z7   1/1     Running   0          2m10s

kubectl get configmap
NAME               DATA   AGE
ubuntu-example     1      2m13s
The Operator will periodically re-run the Controller’s ReconcileAsync method with an event type of “Reconcile” to ensure desired state is achieved and maintained. This is normal, but it may cause some additional log noise.
When we delete our entity, you’ll see that the Finalizer gets called first, followed by our Webhooks, followed then by the Controller. The finalizer will clean up the relevant resources, and then the Controller will run whatever is in the DeletedAsync method if one is specified. Once the finalizer and reconciler are finished running, you’ll be able to query the cluster and see that the configmap, deployment, and two pods are deleted along with our CRD.
Deploying the operator using Kustomize
Until this point, we haven’t deployed the controller into the cluster. We did deploy the CRD, but the controller was running on our local machine and monitoring the Kubernetes cluster for changes to the CRDs. Now that we’ve debugged our controller and we see that it works, it’s time to deploy it into our Kubernetes cluster. This is once again made easy by using the KubeOps library.
If you paid attention to the build log output, you noticed these messages:
Generating Dockerfile
Generating CRDs
Generating Rbac roles
Generating Operator yamls
Generating Installer yamls
This is because on building a project with KubeOps, it automatically runs a series of commands which generate a sample Dockerfile, CRD deployments, RBAC resources, and Operator deployment and installation files. These files are all formatted as Kustomize files, and they’re a good starting point for being able to deploy our Operator into a Kubernetes cluster.
Building the Docker image
The first step is going to be building our Docker image and adding it to our image repository. In this case, I’m going to use a local repository for the output of the docker build command, but if you’re familiar with building and pushing Docker images to a remote repository this process should feel very familiar. The other thing is I’m going to just use the Dockerfile which was output by the KubeOps build process, which is a pretty “normal” Dockerfile for a standard AspNetCore application. All I have to do is run docker build . -t 'ubuntu-operator:latest' and let Docker do the rest of the work for me. Once this process completes, I’ll see a new image named “ubuntu-operator” with a tag of “latest” in my local image repository.
docker image ls
REPOSITORY          TAG          IMAGE ID       CREATED         SIZE
ubuntu-operator     latest       0e9ac2e5f588   4 minutes ago   312MB
...
Customize the Kustomize Files and Deploy
Before we can just deploy our Kustomize files, we have one modification to make. The generated files assume that our docker image is going to be named “operator” but we built it under the name “ubuntu-operator”. When we try to run our Kustomize files to deploy our operator, this will cause an error when it tries to pull the image. In the config/operator/deployment.yml file, find the spec.template.spec.containers.image property and change that to be the image name of the operator. In our case, that’s “ubuntu-operator:latest”. And with that done, we can open a shell in the config/install directory and run kubectl apply -k . to deploy the operator. As a default, the install script will create a new namespace named {controller}-system and deploy the operator workloads into this namespace. Viewing the logs on the operator pod will produce the same logs that we had while debugging locally, and creating an instance of the CRD like we did before will create an Ubuntu deployment and a configmap. Likewise, deleting the CRD will delete the deployment and configmap.
To uninstall the operator, run kubectl delete -k . which will run the Kustomize templates and delete the relevant resources.
Conclusions
The Kubernetes Operator pattern can simplify deploying complex workloads in a Kubernetes cluster. They can be written in a variety of popular programming languages, such as C# (using the KubeOps library), with the only requirement being that they need to be able to run within a Kubernetes cluster. They work by reading the state of the Kubernetes cluster and managing resources based on CRDs, other resources, and external services.